Saturday, August 21, 2010

Storage Areas

My approach to storage of smaller tools and project items is:

  • Items used for a common task are stored together. Old draws are great holders as they are strong.

  • When in use they are on some work table or board. But once finished they need to be placed back into the correct storage area.


The photo on the left shows an old draw that I use to hold most of the common hand tools and supplier needed for stained glass work. The box sits on a light box also used for glass work.

The brush and small ball preen hammer used for glass work is to the right of the storage box. This compact area is just to the right of my work bench.
The box many look like a mess but all the common glass tools are in a small space and I can find what I need quickly.

The second photo shows a portion of an old three shelf bookcase. My router sits on the top of the left half of the case. The left leg of the router stand is just visible in the center of the image and the bottom of the router motor is near the right upper side of the photo.

The photo shows just the left side of this long bookcase. The shelves may look like they are packed full and just a mess. But that is not the case. As an example, the middle shelf has the following type of tools, going left to right:

  • Pliers - locking, cutting and regular.

  • Sheet metal cutting tools, both left and right handed ones.

  • Screw drivers and hex head drivers.

  • Finally, a number of different hammers.


So on this shelf area there are perhaps 75 to 100 different hand tools. But they are in groups and I can usually find the desired tool in under a minute. But if the tool was not put back in the correct area then I'm in trouble.

So my maximize space theory is that if there is some order to your personal chaos a small area can hold a fantastic number of individual items all available to you with a short search!

Saturday, August 14, 2010

Shelves - Part III

In case you are following this BLOG I should have about 2 more posts, beyond this one, to complete my initial story about maximizing space in a small shop. The next topic will be something I am hoping others will help with - Gold Star stained glass panels for the families of our fallen heroes.


Here is a view of one of the long walls in my garage, after about 5 minutes of moving "stuff". At the floor level is a small supply of American Cherry and Walnut "shorts" by Wall Lumber. Above that is two shelves filled with small storage bins.

A number of years ago I had a friend that worked at a Research Triangle Park company (in NC) that was dropping their electronic card repair division. I asked for 3 dozen or so of the small bins shown here. I should have asked for a 100. The price was right - free. By the time I realized their value they were all gone.


Their special property is that they are clear plastic. Now there are a number of wood supply site that have bins similar to these but they come in colors. In many of my bins I store an assortment of related small parts. It is great to be able to look into the bin to see if something in there. The solid color bins look nice but are not as practical as these.

I have a few others on the opposite side wall but this is my main supply.

I always believe in a reuse approach. To the right of the shelves with bin storage is an old TV cabinet a friend gave me.

With the old TV cabinet I did the following:


  • Removed the pocket doors but saved the hardware for a future project. [Pocket door hardware is anywhere from $40 to $100 depending on the size and manufacturer.]

  • Removed the sliding base that allowed the TV to come forward some.

  • Reworked the interior to create a lower space appropriate for larger sheet glass on the right. The size range here is 16" wide and 24" high.

  • Used the sliding base hardware to make a small glass crate able to slide in and out. This crate is appropriate for glass 12" wide and up to 16" high.

  • Created a smaller area for storage of some stock bevels.

  • The top of the cabinet is just an extension of the upper shelf area.


The cabinet doesn't look much like the old TV cabinet but it sure stores lots of supplies.


Now the first photo doesn't show this area as it is usually seen. The final photo shows the normal view. The top row of bins can be seen but most of the rest is behind a number of layers of "stuff".

In front of the lumber on the floor and the lower shelf which was shown in the first photo I store the following items:

  • Wardrobe boxes in from of the lumber.

  • A wide range of sheet wood.

  • A variety of build boards I use for different size stained glass pieces.

  • The cutting boards I use with the Festool plunge saw.

  • A step ladder.


Well keep thinking about how you can maximize you own work space.

Monday, August 9, 2010

Shelves - Part II


Before I show my ceiling storage areas, I'd thought I would mention my wife claims my garage shop is just a giant mess but I say it is organized clutter.

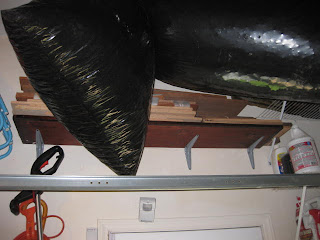
Since the ceiling is 11' high there was a large area under the garage door, when up, that was wasted. So I built a storage crib 6' by 3 1/2' that is hung 26" below the ceiling. It is positioned over the garage door, when it is opened. There are commercial units like this. There are even some that can be raised and lowered. For a single car garage they would be too wide with the center track for the opener. If one had a double car garage it might be possible to mount two, on either side of the track the lifts the door.

In mounting such a storage unit be sure to:

  • Use metal L or strap supports.

  • Attach the parts that go into the ceiling with lag screws that go into the ceiling jousts. I used 1/4" by 4" lag screws. Do not use molly bolts.

  • All lower attachment should be done with steel bolts as well.

  • Finally for the lower edges, especially if you use L metal, file the points as they can give a nasty scratch when you are trying to get something into or out of the storage area.


It's a little difficult getting items up and down from this area. I ship smaller wood items and stained glass all over the country. In ten years I've never purchased a shipping box. Rather all are made from recycled boxes. The best are moving disk packs or wardrobes. The space shown is mostly filled with disk packs and some larger regular moving boxes. Wardrobe size moving boxes cannot fit here, due to the door motor and it's supporting metal braces.


The next photo shows a side view of the unit. On this side there is a wood rod that goes from the far wall to the ceiling unit, near the end on the right in this photo. It can support up to two large rolls of bubble wrap. The photo shows just one. The rod slides back and forth to allow getting the rolls on and off.

The large black plastic bags hold shipping peanuts needed for shipping glass. Like the cardboard boxes, almost all peanuts are recycled. I get them from local stores. I pay the store owner a small amount, about 30% of the cost of new bulk peanuts, pick them up and the store owner gets rid of something they don't need.

The color patterns on the bottom of the ceiling storage unit attest to the pack that 20 years ago it was a 4' by 8' train track board for one of our son's. I really don't throw away much.


This final image shows the other side of the ceiling unit. Here you can see more bags fulled with shipping peanuts. It also shows a small shelf high about the garage side door, just visible at the bottom of the photo with a mounted motion detector for an alarm system.. It holds a supply of 1/4" and 1/2" oak and mahogany wood.

Friday, August 6, 2010

Shelves - The More the Better - Part I

It's about time to more on to another way to maximize space, your use of shelves. The shelves in my space have grown in a somewhat haphazard fashion over the years. Some were put up as needed while others just because I received some material free or at low cost. I have nothing against the high quality, and costly, shelving offered in many woodworking supply stores and catalogues. It's just I'd rather spend my $$ on good tools. Shelves in a work area are for use not for show, in my opinion.

The suggestions I would offer related to installing shelves are:

  1. Plan to do one area at a time. Your needs my change over time as to height, depth, weight on the shelves, etc. If you do all your space at once the arrangement may not fit into your future needs.

  2. Be careful to set the height of the lowest shelf such that you will not hit your head on it if you can get close to the shelf. I've avoided this by having tables,old cabinets, and old book shelves below most.

  3. Assuming you use inexpensive shelves like I have, the shelf supports are critical. I'll address this below.


The first photo shows the shelves above my work bench. Since I have the advantage of an 11' ceiling there are three levels. The top two layers are the widest open wire shelving I could find at 16". These two shelves are spaced vertically to yield about 24" of height. The lower shelf is only 12" wide, so I will not hit my head if I lead over my workbench. Some other space saving hints:

  • On the lowest shelf on the left you can see a small basket like attachment that adds a small additional shelf.

  • If you look closely you can also see that there are a few long thin items that are positioned on the front shelf supports. I try to waste no room.


Now let's look at the back supports for the open wire shelves. The usual plastic clips are visible in the center. If you look closely you will see that there are 3 close together. Two, the outside ones, are attached in the usual direction where the open part of the clip faces up such that the back of the shelf is forced down onto the clips. After this is done I then force another clip, in this case the center one, on going in the opposite direction. This makes it impossible for the shelf to come loose in the back. On the extreme left you might also see a metal hook (an electric conduit clamp) that I used as well. One of the first shelves I installed only used the plastic clips all put on in the usually direction. One evening the whole back of the shelf came off the clips and then slid down. Luckily the front clips didn't come off.

The third photo shows the front open metal shelf supports. I generally place one at every stud position, that is the lower of the bar support which has one one hole in it will use a screw into the stud. My feeling is you never know what will go on the shelf at some future time so make it as strongly supported as possible. This last photo also shows another space saver. I've installed simple L brackets within the space created by the front shelf supports. This creates supports to store some lumber strips. They might be a little hard to get in or out but I have more space.

For smaller hardwood projects I often purchase short wood bundles from my supplier Wall Lumber in Mayodan, NC. The wood in such bundles is usually from 24" to 36" in length, cutoff from larger orders. The price is very attractive. Such lengths easily fit into the space under the supports.

I'll continue more hints about maximizing your space with shelving in the next few posts.

Thursday, August 5, 2010

Better Then a Table Saw at 10% of the Space

Conventional wisdom would say that for serious hardwood furniture work one must have a table saw, and not a $250 one either. Well let me tell you that there is an alternative that:

  • Needs very little space when not in use.

  • Can be set up on a Black & Decker Workmate 425.

  • Is much safer then any table saw.

  • Collects saw dust better then any unit short of commercial $10,000 one.

  • Is portable if needed!


The answer is a Festool plunge saw system. I have an 8 year old model AFT 55 E. The current model is 55 EQ. The photo shows the plunge saw, a Workmate table set to just two top sections, a cutting surface (2 3/4" ply thick) which is leaning against a stack of Festool containers with the dust extractor at the bottom, it's hidden by the cutting surface.

The safety of a plunge saw is that the blade drops down into the wood and is never exposed. The AFT 55 line uses a 6 1/4" diameter thin ferf blade yet achieves a cutting depth on the track system to handle 8/4 wood (1 15/16"). The blade's cutting width is 3/32". With the electronic controls the saw system will not damage itself. The speed light will glow red and the saw will stop. I've had this happen a few times when cutting 8/4 hardwoods.


The photo on the right shows my cutting arrangement and one end of a Festool Saw Guide Rail System. The top of the Workmate table is hidden. On it I've positioned the cutting board that was shown standing up in the first photo. This is bolted to the Workmate. On top of this surface is placed a sacrifice layer of 1/8" plywood. The layer is usually changed a few times a year. The Festool plunge saw has a 1 mm step positive stop depth feature. The best cut is obtained with just entering the sacrifice cover. At the end of the guide rail you can see one of the Festool end clamps used to secure the guide. These clamps slide into grooves in the rail. The setup shown has an oak 4/4 board set for a trim cut. The section to be cut off is to the left of the guide rail. I can cut off widths less then the blades kerf, 3/32", although one gets some dust. If I set the minimum width at say 5/32", there will be little dust not collected and one ends with a veneer strip.


The final photo shows the total system. The back of the saw is attached via a long green tube to the vacuum port of the dust extractor system. This unit has large caster wheels. Each Festool item comes in a plastic case which can mount on top of the dust extractor as shown in the photo. The tool being used, in this case the plunge saw is powered from the extractor. It senses when a tool is turned off and continues vacuum pressure for about 5 sec.

Setup and cutting is very easy with the Festool guide rails system. Once you have done a first cut against the rubber guide strip on the cutting side of the rail the position of all further cuts is shown by this edge. The cut width will be the blades 3/32" kerf. Thus a few marks will line up the cutting point.

For wood buildup this saw achieves clean enough cuts on hardwoods such that no sanding is necessary. It also keeps edge chipping to a minimum even on woods that a noted for some. For cut surfaces that will be exposed I usually only need light hand sanding to remove any saw marks.

The primary market, in my opinion, is for professional re-modellers that need to work in a client's home. Thus the focus on portability and dust extraction while giving the quality cut one would expect from a stationary table saw system costing $2,000 or more.

The net here my Festool Plunge Saw system is the single most critical component of me being able to do serious woodworking in a small space. If they could only come out with a lathe I could have every major wood tool in my small space.

[PS I have no stock or connection to the Festool corporation other then a very happy user of their products.]

Monday, August 2, 2010

Tables and Tools Part II - Router and Framing Saw


I have two more tools on heavy plywood bases for fixed positioning on my Work Mate tables. The first is a venerable Sears router. Routers are cheap when compared to the router bits. I usually charge a client 30% of a bits cost if I need to buy a new one for their job. I'm up-front on the charge and list it on the client's Invoice. If you count all the bits shown plus those I could fit on the router table their combined cost - at $25 to $50 per bit, is the most expensive item in my woodworking stable since I must have 50+ bits. [When I get to my Festool woodworking tools, the best in the world in my opinion, no single tools exceeds this cost.]


As always, in the desire to maximize space, the router table when not in use sits on an old bookcase and serves as a two levels storage unit. The only downside is when I need to use the router it might take 3 to 4 minutes to move all the items stored there to my workbench.


The final table top tool is a manual extended base NOBEX Proman framing system. When it's stop is used I can achieve consistent length cuts to within 1/64". The stop works from about 12" lengths to just under 48". In this photo the black knob above the saw blade, to the right of the back holding frame, is the lock for the stop. This tool is critical for the construction of "true square" glass or wood frames. True square means the two diagonals of a rectangular shape are the same length. I usually get to within 1/16" on diagonal lengths in the 24" to 48" range. You can see the front bolt used to secure the long framing system to my Workmate 425 table.

As seems the case, when you find a tool you really like the manufacturer drops it. About 4 years ago I found that NOBEX was dropping the Proman line for their larger framing system, So I bought a 20 year supply, for me, of the 24 TPI (for wood) and the 32 TPI (for soft metal like zinc and brass).

Thursday, July 29, 2010

Tables and Tools Part I - Radial Arm Saw

When cutting materials; wood, glass, picture mat cardboard, or whatever the two main things that lead to a bad cut are: you measured wrong or something slipped during the cutting process. The old carpenter's run of measure twice and cut once usually works. But I'll admit that even then I sometimes make mistakes. However, slipping during cutting can be greatly reduced if your cutting system is securely attached to a table or stand. Firm attachment is also the safe way to use any electric high speed cutting system. While I'm mentioning safety, good quality safety glasses are also a must when using a high speed cutting device. I'm sure we all know that but the use of safety glasses cannot be stressed enough.

I mount all my larger tools onto plywood bases so that they can be firmly attached to a table top with clamps or bolts. The first tool shown is a 10" radial arm saw mounted on a 1" plywood base (1/2" ply was the scrap I had at the time). The base size was set for easy clamping to my Black & Decker Workmate 425 tables as shown in the photo. There is a second clamp in use hidden behind the saw. Two large clamps are sufficient. In this setup the clamps are at the back side. Front mounted clamps would actually be a hazard as they could get in the way of easy hand motion while using the saw.

A firm tool base allows for easier movement of the tool and placing the tool back to where it is stored. In my attempt to maximize space each tool has an assigned storage space, usually on the top of an old bookcase or cabinet to help save my back when moving it. Here the radial saw storage space is the top of an old TV stand. The front doors are long gone and the interior space is divided by a shelf into two areas to yield lots of storage and the saw at almost the height of the Workmate tables.


For sheet glass cutting there are two additional potential problems that can lead to bad cuts. First, the surface needs to be flat. This is the issue for the newer Work Mate 425 table which makes it of little use for glass cutting. As shown in my post of July 23rd the three table sections don't mate to a flat top. The flat surface should be covered with a firm material that has just a little give. Some use carpet covers but I find carpet holds too many little slivers of glass that sometime "bite". So I use picture mat cardboard. I cut the sheets to the size of the Workmate table top. At the art supply stores I usually ask if they have any damaged sheets, at a reduced price.

The second glass cutting problem is small pieces of glass, from prior cuts, getting onto the surface. These small pieces can serve as pressure points on the glass sheet resulting in poor cracks while scoring the glass. The general rule is to sweep or vacuum the surface after each cut. A white mat is easier to sweep clean and colored glass chips are more easily seen.

Monday, July 26, 2010

Tables for Larger Equipment


A few years ago I replaced a smaller Sears Craftsman drill press with Delta Model DP300L press. The main reason I selected this model was it was the smallest one that would accept a mortising attachment. After getting it I realizing it needed a dedicated table since, at 78 lbs, it was too heavy to lift onto one of the Workmate tables from the floor.

To continue the theme of maximizing space my table design has two storage shelves below. They add about 8 sq ft of storage space to my workshop. They hold most of my drill bits and the mortising attachment pieces. On something this heavy it is important to use large wheels and at least some should be locking. I installed four locking 4" diameter swivel wheels.


The construction is similar to my work bench frame the legs made from doubled two by fours. The leg wood is leftover Douglas fir. The shelves are made from whatever leftover plywood I had on hand and the shelf caps oak cutoff strips. The only items that I needed to purchase were the locking swivel wheels.

Friday, July 23, 2010

Movable Tables


Besides a fixed table, like my workbench, a small work area needs some movable tables. I recommend at least 2 in addition to any dedicated tables for heavy equipment. I have been pleased with my Black and Decker Workmate 425 tables over the years. More pleased with the old version.


The Workmate bench on the right in the top photo, with a cardboard cover on it, is about 15 years old. It is the better of the two as the metal frame is heavier then a more recent Workmate 425. Even more importantly, the top of the older table is 7/8" composite material that mates to a flat surface when closed. It was made in Canada. The newer version, made in China, has a plywood top that is only 5/8" thick and does not close to a flat surface. If you are familiar with the 425 Workmate the top is made of 3 sections and can be opened with the large orange turn handles on the front. On the right I show the new Workmate 425 top from the side, where one can see the mismatch, and then the old Workmate 425 top. As you can see the old one has lots of use marks but still mates nicely to a flat surface.


This allows for some clamping capability as well as using the surface with just 2 of the 3 sections in place. When I discuss cutting glass I'll come back to this not flat defect as it limits my use of this table. The older version, made in Canada, has not been available for many years. If you ever see one at a garage sale buy it!

I find it interesting that Black and Decker didn't compensate for the thinner top, perhaps their quality control never noticed! If I try to use both tables, to form a long work area, the newer one is 1/4" lower DUH.

The final table type I'll discuss is those needed for heavy pieces of equipment. This will be the topic of my next post. Until then keep trying to pack 10 lbs into a 5 lb sack!

Tuesday, July 20, 2010

The Workbench


The first item a workshop needs is a proper workbench. I constructed mine in early 1999. The frame, lower tray and the drawers are Douglas fir while the top is red oak. I used a combination of designs to fit my space needs.

So the features of importance for this post thread are: it was custom made to just fit the width I had, I added draws and a shelf area not in most workbench plans to maximize my storage.

The top design is based on a one sold by PlansNow with the title "European-Style Workbench". The top size was custom for my area. The frame, drawers and tray were a combination of ideas from multiple plans I looked at sized to my available space.

The frame is made with a "knock down" approach. No glue is used. The drawer runners and lower tray shelf are screwed to the frame members. Thus they can be removed with a little effort. The frame itself is held together by bolts that fit into recesses in the beautiful Douglas fir. I've never taken it apart but some day one of my sons or grandsons will when they inherit it.

The top is made in two layers. The base is made from 2 layers of 3/4" birch plywood glued and screwed together. The top layer is 1" by 2" red oak strips that go the full length of the top. The oak strips are attached to the plywood base using a construction Adhesive called PL 200. This adhesive allows for expansion and contraction of the top to avoid warping. Finally a 1" by 3" oak trim is placed around the perimeter flush with the top of the oak. This trim is held in place by screws that only go into the plywood base. The top sits on the frame held by it's weight, about 100 lbs. Each frame leg has a steel pin sticking up that mates with a hole in the bottom plywood base so the top cannot shift. Two people are needed to lift the top off the frame.

The top is protected by coats of Behr brand Scandinavian Tung Oil (#600 natural clear). I usually add a coat once a year when I know I'll not be using the bench for a week or so.

After 11 years of use I recently refinished the top for the first time. Most of the effort was in removing perhaps 10 coats of Tung Oil and then doing a little sanding of the rad oak to get to a clean looking surface.

How to maximize your shop space


This is the initial topic I'd like to discuss. My studio started as a medium sized one car garage: 11 foot wide, 11 foot high and 21 foot deep area. There is a 3 foot by 7 foot space in a back corner taken up by 3 steps and a landing into our home's living space.

So the space is rather small for construction of a queen sized walnut bed, a 5 foot long oak sideboards or a framed 18 sq ft stained glass panel to give some examples of larger projects I've made.

I have a feeling that others might be interested in some of the approaches I've used over the last 12 years to maximize my usable space. Others might be able to supply their own space saving tips will allow me to get more then 10 lbs in my 5 lb sack - as the old saying goes.

I'll tackle specific items in posts to follow. For now here is a photo of my studio, from the garage door, as it looks today shows my starting point.